

You will need to configure the invoice settings that determine certain company-wide settings that affect all customer invoices.
Default Notes/Instructions for Invoices: The text entered here on the will appear in the 'Notes/Instructions' box on all invoices. You may still override these notes for individual invoices by editing the invoice "Notes".
Payment Terms: The way in which you request payment from your customers. Use the dropdown menu to choose your terms.
Note: "Net 7" means the amount is due 7 days from the time the email was sent out.
Commercial Payment Terms: If you would like to offer commercial accounts different payment terms, you will want to turn this option on and set the payment terms specific to your commercial properties. When this is turned on commercial invoices will show due dates on invoices and change to "Past Due" according to these new payment terms.
Default Invoice Message: A customizable message displayed on all invoices near the bottom of the page.
Default Pay Stub Invoice Message: The message here will show up at the bottom of pre-printed invoices with pay stub when printing from the scheduled routes screen.
Hide/Show Sales Tax: If you charge sales tax you will need to toggle the switch to “Show”, but if you are in a state that does not charge sales tax, then switch it to “Hide”.
Show Property Name on Invoices: When turned "On" the Property Name will show on the top line of the service address on invoices.
Convenience Fee: A credit card processing fee charged by Fiserv for online payment processing. Once this fee is updated in Invoice Settings, it will automatically be added to the total amount due at time of payment. The customer will not see this charge until they click Pay Now on their invoice.
For more information, see: Credit Card Processing & Payments
Auto-Send Invoices by Email: Switch to "ON" position if you'd like all of your "unsent" invoices to be emailed/texted automatically at a time of your choosing. Switch to "OFF" position if you'd like manually send invoices to your customers from the tech view or admin view.
Ability for Technician to Add Standalone Service to Property: Allows the technician to add a service while at the property.
Example: Your technician observes brown patches at the property that weren't previously recorded. He now has the ability to add a service on the spot and complete it that day or schedule for a future date.
Automatically Send Monthly Statement: If this switch is toggled on, a monthly statement will be sent out automatically to any customers who currently have an outstanding balance due. This statement goes out on the 1st of the month. You can view a customer's statement beforehand by going to the customer profile and clicking Generate Statement at the top of the screen.
Show Total Balance Due on Invoices: When this feature is turned on, customers will see their total balance owed on each invoice that goes out instead of just seeing the amount of the current invoice. The customer will be required to pay the total balance due and will not be able to pay for the individual invoice.
Add a Pay Now option to all invoices: Checking this option will allow your customers to pay using ANY credit card or payment processor. You will be prompted to enter the link from your current payment processor that allows you to accept payments online. A "Pay Now" button will be enabled on all invoices sent out to your customers. Please keep in mind this is not a direct integration with the Spraye system, simply a link to your external payment processor.
IMPORTANT: Only check this box if do not plan to use Fiserv or SprayePay(PayPal).

This section above appears at the bottom of the Invoices Settings page within Global Settings. It presents a list of optional fields that you can choose to include on all customer invoices. Navigate to it by hovering over your profile image in the top right corner of Spraye, selecting Settings, and scrolling to the Invoices Settings section.
How It Works
Each checkbox in this section represents an optional data field. When you check a field and click Submit, that field is automatically included on every invoice sent to every customer. No per-invoice or per-customer configuration needed.
If a field is left unchecked, it will not appear on any invoices, even if the data exists in the system. This gives you control over how much detail customers see on their invoices without having to manage it individually.
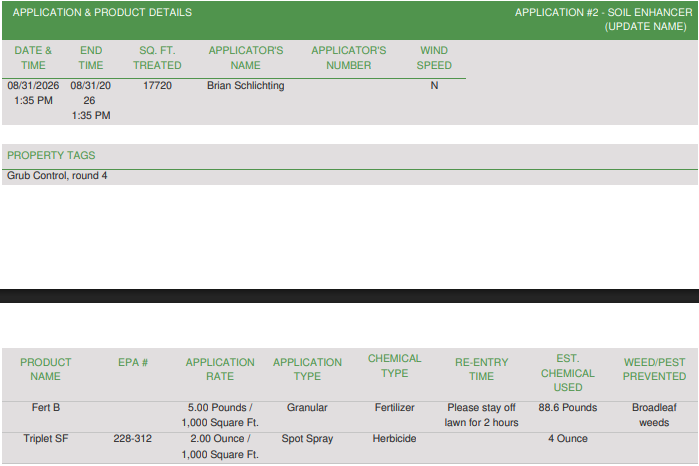
Available Fields
The available checkboxes are displayed directly in the Invoices Settings page. The specific options visible will depend on your account configuration, but include fields such as Property Tags.
Note on Property Tags: Enabling this field does double duty. Property Tags will appear on customer invoices and on printed work orders generated from the scheduled routes screen.
For any field to display useful information on an invoice, the relevant data must already be filled in on the property or customer record. If the data hasn't been entered in the system, enabling the field will have no visible effect on the invoice.
Saving Your Changes
After selecting all the fields you want included on invoices, click Submit at the bottom of the page. Changes will not be saved if you navigate away without clicking Submit.
For more information, see: Creating & Sending Invoices